Pond No. 1
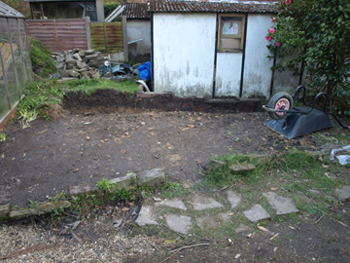 After nearly 8 years without a Koi pond, we finally got round to digging again in 2011! Mike and a friend of ours (Josh Langton) started digging the pond at the end of March 2011. As can be seen on the original drawing I did of the garden, I had allowed for a pond and had calculated it would hold approximately 3,656 gallons of water. After Mike and Josh had filled approximately 5 skips with soil and solid clay, we had high hopes of the pond being nearer 4,500 gallons which, to me, is an ideal size for a koi pond. After nearly 8 years without a Koi pond, we finally got round to digging again in 2011! Mike and a friend of ours (Josh Langton) started digging the pond at the end of March 2011. As can be seen on the original drawing I did of the garden, I had allowed for a pond and had calculated it would hold approximately 3,656 gallons of water. After Mike and Josh had filled approximately 5 skips with soil and solid clay, we had high hopes of the pond being nearer 4,500 gallons which, to me, is an ideal size for a koi pond.
Initially we hadn't decided on whether to go for a butyl liner or have it fibre-glassed, nor had we decided on the filtration. This probably wasn't the ideal way to go about things but, at this stage, I just wanted to see the hole being dug! In an ideal world it is recommended to plan EVERYTHING first!
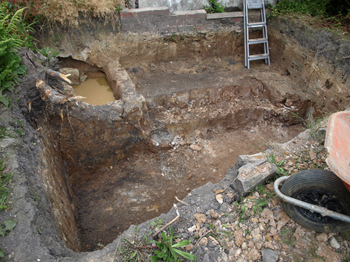 
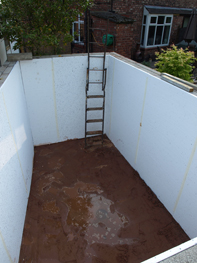
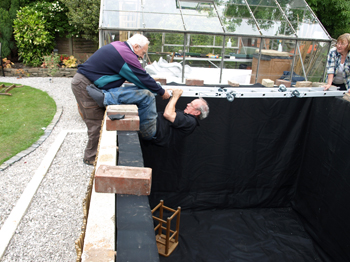
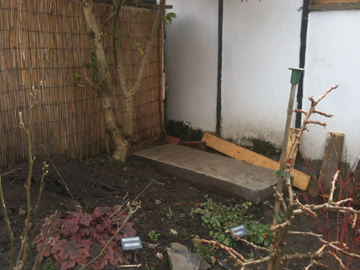
Well, as ever, best laid plans and all that! Not least of our problems was the fact that we had 3 landslides due to heavy rain and, indeed, in early August 2011 we had to start building internal walls – even though the hole wasn’t completely dug – simply to hold the earth back (see photo above right). If we hadn’t acted quickly we could have ended up with the greenhouse in the hole! In addition to all this we also had a major tree root to contend with from a 16ft Christmas tree which was chopped down two years ago (see above left - left-hand side).
Although the initial digging was relatively easy, we soon hit solid clay. Josh did a lot of the digging whilst Mike was wheeling the barrowloads of clay round to the front of the house, up a ramp, and into the skip. Then, when it got too much, they reversed roles! Thankfully, 5 skips later, the hole was finally complete – mind you, I don’t think we could have got another teaspoonful of clay in the last skip!
The pond was now going to be smaller than we had originally intended and looked like being around 3,500 gallons including filters, although the water depth would be approximately 5ft 6”.
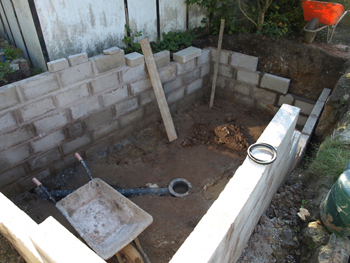 For the inner walls we used 17” x 8” (4” thick) concrete blocks laid on a 6” concrete collar – it was intended to have five rows below ground and three above. It was also planned to have the outer walls (above ground level) in Indian stone to match up with the new patio and walls which were built in July 2011. For the inner walls we used 17” x 8” (4” thick) concrete blocks laid on a 6” concrete collar – it was intended to have five rows below ground and three above. It was also planned to have the outer walls (above ground level) in Indian stone to match up with the new patio and walls which were built in July 2011.
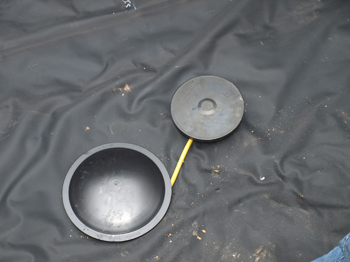
We discussed the various options of liner, fibreglassing or rendering with G4. Fortunately, Mike has contacts within the trade and so we were able to purchase a box-welded liner at an extremely good price so we decided to opt for this. We originally hoped to be ordering it on the 3rd October, 2011 – it turned out to be 29th May, 2012! Even though it was more expensive we opted for a box-welded liner, rather than a flat sheet, as it can be difficult to hide the creases if using the latter. We were also going to incorporate a bottom drain – something which our original pond, in the 1980s, didn't have! This can be seen in situ above.
The next decision to be made was the ever-controversial filtration system! We looked at Nexus filters, a 3-chamber module with vortex on the end, vortex units to be used with media (such as K1) as well as a settling chamber or sand filters. We were leaning more to a Nexus, although they are expensive, with a sand filter. Previous experience with the Nexus had taught us that, although they are excellent filters, you still need a sand filter, or similar, to polish the water and get rid of the fine particles of debris. However, in the end, finances helped us to make up our mind.
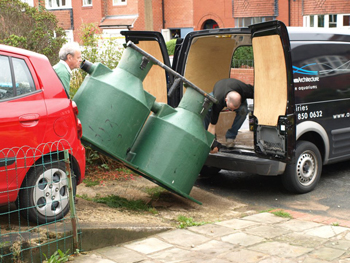
Ronnie Hewitt of Poolkoi contacted us to let us know that one of his customers was selling up and there were three large vortex chambers (a twin unit and a single unit), together with two air pumps and a large amount of Kaldness (K1) for sale. It was too good an opportunity to miss and so we put in an offer and duly collected them on 9th October, 2011. This, in itself, was a problem as they had to be lifted over a fence and across someone else's garden. Likewise, at our end we knew we would have to take them up next door's drive, through his garden and, again, over the fence.
Our initial thoughts were to put the filtration system inside a shed. Our local koi club (The Northern Koi Club) had an Open Day in August 2011 when we visited four ponds, all of which had their filtration systems under cover – in different disguises. I would personally advise everyone to put their filtration inside, wherever possible – it just makes it so much easier to maintain the filters in all weathers! However, when we got the filters home we realised that next door's shed and garage were too close together and there wasn't enough room for us to squeeze through to to lift them over the fence! So we had to think again and decided to put them in our garage.
At this moment in time we were really hoping to move quickly as we wanted to get some koi in the pond before the temperatures dropped too much – this was yet another dream that went out of the window!
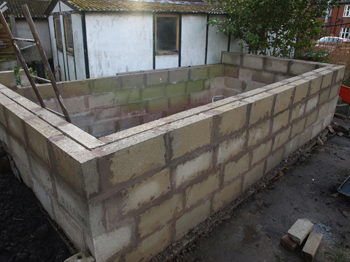 You may remember, a few paragraphs ago, that the outer wall of the pond was going to be in Indian stone to match up with our new patio and walls. For speed we decided to do it all in concrete blocks and then paint the outer wall white. Then, time and money permitting, we could build the Indian stone wall in Spring 2012. Do you like how I keep saying “we” – I do, of course, mean Mike!! You may remember, a few paragraphs ago, that the outer wall of the pond was going to be in Indian stone to match up with our new patio and walls. For speed we decided to do it all in concrete blocks and then paint the outer wall white. Then, time and money permitting, we could build the Indian stone wall in Spring 2012. Do you like how I keep saying “we” – I do, of course, mean Mike!!
Mike had finished both the inner and outer walls in concrete block when we (sorry, I mean “I”) decided we should go another block higher to give us more depth. This was partly due to the filters now having to go in the garage as it meant that the pond water level wouldn’t be high enough! In turn, this also cost us another skip, as we had to have a massive clear-out of the garage in order to get the filters in – this included some of Mike’s Grandfather’s stuff! It was perhaps as well that we hadn't ordered the liner at this stage!
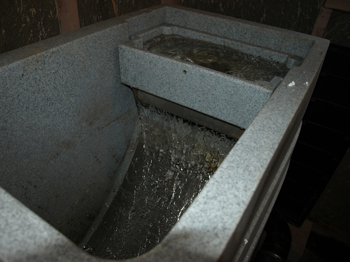
 Mike and our friend Josh (together with his van!) went to collect the vortex units which Ronnie Hewitt had secured for us – there was one double unit and one single. It took two trips but everything arrived back safely. Ronnie's customer was also selling an Evolution Aqua Sieve but we weren’t sure whether it would be suitable for our pond. After much measuring and research, Mike decided that it would be suitable and felt it was too good an opportunity to miss. The only downside to the sieve was that it was going to have to be gravity fed which meant that the water from the pond is divided – half goes through the sieve and half goes straight to the first filter – this is Evolution Aqua's design. But at least it would still sieve out a lot of the initial particles. If it is pump fed then ALL the water goes through the sieve. Mike and our friend Josh (together with his van!) went to collect the vortex units which Ronnie Hewitt had secured for us – there was one double unit and one single. It took two trips but everything arrived back safely. Ronnie's customer was also selling an Evolution Aqua Sieve but we weren’t sure whether it would be suitable for our pond. After much measuring and research, Mike decided that it would be suitable and felt it was too good an opportunity to miss. The only downside to the sieve was that it was going to have to be gravity fed which meant that the water from the pond is divided – half goes through the sieve and half goes straight to the first filter – this is Evolution Aqua's design. But at least it would still sieve out a lot of the initial particles. If it is pump fed then ALL the water goes through the sieve.
By the end of October 2011 most of the pipe work was done. The 4’’ pipe from the pond to both the sieve and vortex units was in place, complete with an isolation slide valve in the main feed, the main pump (Oase Aquamax 16000) was plumbed in and the return to the pond was ready for when the LAST row of blocks was completed. The transfer pipes in the vortex units were still to be completed as Mike needed to do some further research on the best way to do this and still retain the K1 within each unit. The air pumps were ready although a better way of producing more air was still being looked at.
It was clear, at this stage, that we would not be able to get any Koi in this year (2011)!
 March 2012 March 2012
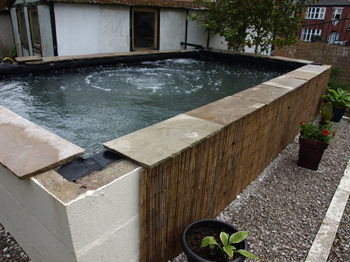
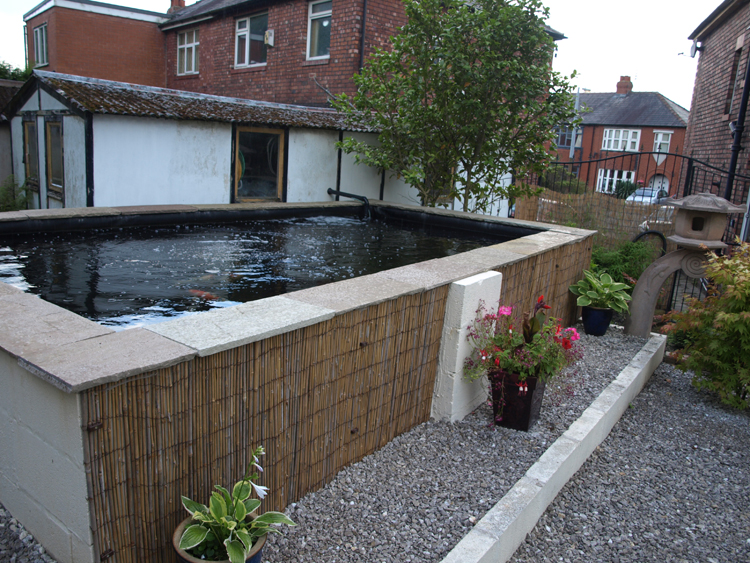
We finally managed to start again mid-March 2012 and I’m pleased to say the blockwork is now complete and will not be going any higher! I also painted the outside blockwork in magnolia – we decided that white would have been too harsh. However, we have also put some reed fencing against the end wall which backs onto a flower bed – it looked really good and so we decided to put it along the front wall as well which will be infinitely cheaper than building an Indian stone wall in front! (See photo at bottom of page.)
The downside of raising the height of the pond was that I had to stand on my tip-toes to see into the pond so we had build a viewing platform the full-length of the pond – see photo right!
After going through a very quiet period due to the weather and going away to Scotland twice in April and May the end of May / beginning of June suddenly became a hive of activity.
We had a ton of sand delivered that had to be barrowed round the side of the house, up the garden steps, and tipped into the bottom of the pond. This was then levelled off so that Mike could accurately measure up for the liner. As mentioned earlier, we had decided to go for a box-welded liner as, although this would be more expensive, it would be easier to fit and it would also mean that we could avoid any creases or folds in the liner that would look unsightly. The liner was ordered on Tuesday 29th May and delivered on the morning of Friday 1st June – excellent service!
 Having heard members of the Northern Koi Club talk about using Kingspan insulation boards for lining ponds to help retain heat we agreed that this would be a good idea. However, we decided to use Jablite flooring insulation – just as effective and half the price! Our nextdoor neighbour (Paul Rodgers) has a large van and he went to pick up the boards for us. On Friday, 1st June, Mike duly glued the boards to the inner walls of the pond – in addition to retaining heat they also protect any possible sharp protrusions from the concrete blocks. Having heard members of the Northern Koi Club talk about using Kingspan insulation boards for lining ponds to help retain heat we agreed that this would be a good idea. However, we decided to use Jablite flooring insulation – just as effective and half the price! Our nextdoor neighbour (Paul Rodgers) has a large van and he went to pick up the boards for us. On Friday, 1st June, Mike duly glued the boards to the inner walls of the pond – in addition to retaining heat they also protect any possible sharp protrusions from the concrete blocks.
On Saturday, 2nd June my brother and his wife came up to give us a hand to drop the liner into place. We had already got some Blagdon underlay that had never been used so that was put onto the bottom of the pond. Having unfolded the liner on the lawn to check which was the correct way round for it to be dropped into the hole, Mike then got into the bottom of the pond whilst Malcolm and Kath held the liner in the correct position for opening up the first side. Mike immediately took his boots off in case there were any lumps of gravel wedged in the soles that might damage the liner once it was in place.
Between the three of them the placing of the liner went extremely well – unfortunately I was unable to help at all as I was having serious back problems but I was, of course, able to supervise and take photos! As each side was straightened out, bricks were strategically placed along the top edge to hold it in place.
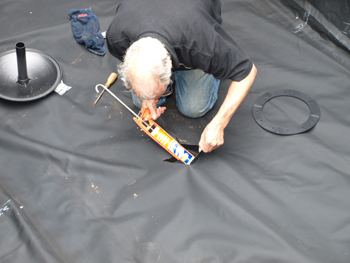
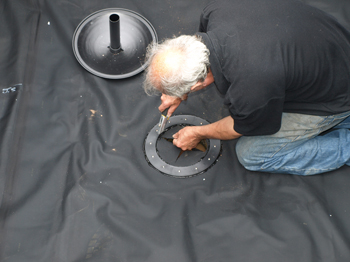
The next step was to cut the liner and put a flange in for the bottom drain to be connected up. People are often horrified at cutting holes in liners but it’s something that Mike has done, successfully, on many occasions.
 We had already got a pond aerator which had never been used so we decided to see if we could push a piece of hose down the access pipe, round a 90 degree bend, round a 45 degree bend and up through the bottom drain to attach to the aerator. This turned out to be a lot easier than expected and meant we wouldn’t have to have any airlines dangling about in the water that, not only look unsightly, but can occasionally cause problems if the koi get caught in them. We had already got a pond aerator which had never been used so we decided to see if we could push a piece of hose down the access pipe, round a 90 degree bend, round a 45 degree bend and up through the bottom drain to attach to the aerator. This turned out to be a lot easier than expected and meant we wouldn’t have to have any airlines dangling about in the water that, not only look unsightly, but can occasionally cause problems if the koi get caught in them.
Laying the underlay, putting in the liner, securing with bricks, cutting the hole and putting in the flange etc for the bottom drain and threading the hosepipe through for the aerator was all done in an hour and a half – sheer teamwork! However, the next problem was – how was Mike going to get out of the pond (bear in mind that the wall is 6ft 6in!!). He didn’t want to put a ladder in because the weight of him on the rungs could have caused the feet to go through the liner – plus the fact that the rubber feet had come off the bottom and there were some sharp edges. I won’t say anymore about this other than – “look at the photo below”!! The full sequence of Mike getting out of the pond can be seen in The Pond Album!
 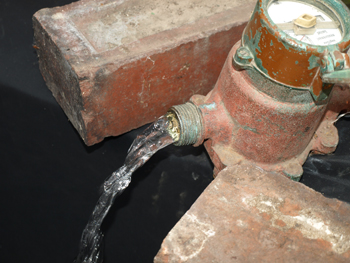 At 3.30 that afternoon we were ready to switch on the hosepipe – it’s a good job we weren’t on a hosepipe ban and nor were we on a water meter. We attached a flow meter to the hosepipe so that we could accurately check the gallonage. It had filled the pond by 12 mid-day the following day. Including the filters it holds 3,651 gallons. A couple of days later I found the drawing that I had originally done in the Spring of 2010 when we were thinking of attacking the garden. The diagram, obviously, included a pond but I had completely forgotten what I had estimated the gallonage to be – 3,656 – only 5 gallons out! At 3.30 that afternoon we were ready to switch on the hosepipe – it’s a good job we weren’t on a hosepipe ban and nor were we on a water meter. We attached a flow meter to the hosepipe so that we could accurately check the gallonage. It had filled the pond by 12 mid-day the following day. Including the filters it holds 3,651 gallons. A couple of days later I found the drawing that I had originally done in the Spring of 2010 when we were thinking of attacking the garden. The diagram, obviously, included a pond but I had completely forgotten what I had estimated the gallonage to be – 3,656 – only 5 gallons out!
Another hole was drilled in the garage for the return pipe from the filters to the pond and a venturi put onto the end.
When we had originally bought the vortex units and Evolution Aqua sieve they came complete with Kaldness (K1) media and two 4800lph air pumps. Mike had taken some of the K1 to Sue & Tony McCann of Your Koi the week before we started filling the pond so that it could be put into their filters to seed which, ultimately, would help to speed up the process. The rest of the Kaldness was put into the middle vortex unit when the pond was full, together with aeration from one of the 4800lph air pumps. The second air pump was used to feed the first vortex and the pond aerator.
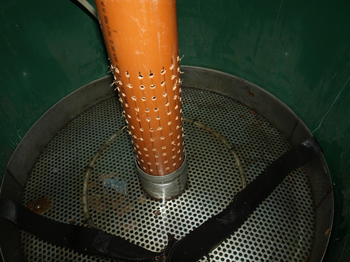 The transfer pipe in the first two vortex units also needed more holes drilling in them to allow for better flow of water – 240 holes in each one! (See photo right) The transfer pipe in the first two vortex units also needed more holes drilling in them to allow for better flow of water – 240 holes in each one! (See photo right)
Next step was the major switch on! The pond looked like a tsunami with the amount of aeration coming from the aerator and the venturi! But it looked fantastic – it’s only koi-keepers who will stand out in the pouring rain getting excited about moving water!! (See photo below).
At this stage we still hadn’t decided what to use for coping stones around the edge of the pond so, on Wednesday, 6th June we went to Benchmark Building Supplies in Marple. They had some Indian stone coping stones and, as the patio and retaining walls to the garden had been done in Indian stone we decided it would make sense to go for these. The assistant went to get us a price and then came back and said that if we went for the Indian stone patio flags, that were exactly the same size, they were virtually half the price! Needless to say, we didn’t argue. The photo above left shows most of the flags in situ – they’ve yet to be glued in but the non-stop rain over the last few days (second weekend of June 2012) had prevented us from doing this.
 We then managed to source a look-a-like Aquamax Eco 12,000 for less than half the price and this was duly connected up on Friday, 8th June which enabled us to get the sieve up and running. We then managed to source a look-a-like Aquamax Eco 12,000 for less than half the price and this was duly connected up on Friday, 8th June which enabled us to get the sieve up and running.
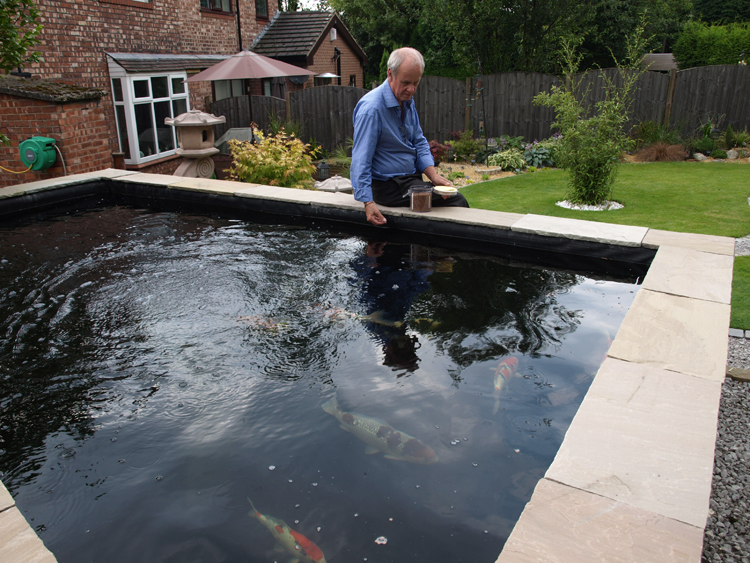
The first three koi, purchased from Your Koi, were finally introduced to their new home on 16th June, 2012 and, the following morning, were happily swimming around and feeding. Our thanks go to Sue & Tony at Your Koi for allowing our koi to lodge in their ponds for so long - one since August 2011 and two since November 2011! The photos of our koi can be seen on the koi page where we will continue to add photos of new additions.
At the same time we brought back some of the K1 which had been seeding in Your Koi's filters. We also put 1 litre of Evolution Aqua's Pure Pond into the filters. These are biodegradable balls which are full of live bacteria that are slowly released as needed.
 Although we should have added a UV (ultra-violet) steriliser at the start we decided to wait a while as funds were getting depleted! However, despite the amount of rain we had during June we still had a lot of strong sunshine and the water began going green extremely quickly, so, on 29th June Mike duly added a Kockney Koi Yamitsu Koi 55w UV – purchased from Cascade Water Gardens. Although we should have added a UV (ultra-violet) steriliser at the start we decided to wait a while as funds were getting depleted! However, despite the amount of rain we had during June we still had a lot of strong sunshine and the water began going green extremely quickly, so, on 29th June Mike duly added a Kockney Koi Yamitsu Koi 55w UV – purchased from Cascade Water Gardens.
Additional Equipment
There are still a few items to be purchased as well as on-going tweaks to the overall running of the pond and I shall keep you updated on these as they happen. Another air pump is on the shopping list – at the moment we're not sure whether it will be an additional air pump or whether we shall simply go for one large air pump to cope with everything and then sell off the existing two but we need to do some research on this first.
We already have a floating basket - the photos of the koi were taken in it. However, we are also going to get a measuring bowl which can be used, as it says on the tin, for measuring the koi. They also allow for better photographs to be taken as well as being able to inspect and/or treat an individual koi. This is one of those pieces of equipment that can be expensive for what they are but, once you've bought it, it will last forever!
Heating the Pond
 We had originally hoped to purchase an Elecro 3w heater for the Autumn but, in a nutshell, we had overspent! However, at the November 2012 meeting of The Northern Koi Club the guest speaker was Garry Joyce of Crystal Clear Ponds and he convinced us that we should be looking at a heat pump. The initial outlay would be expensive but, the running costs are considerably cheaper. Finally, in March 2013 Mike laid a concrete base for the heat pump which we ordered from Crystal Clear Ponds on 17th March. We had originally hoped to purchase an Elecro 3w heater for the Autumn but, in a nutshell, we had overspent! However, at the November 2012 meeting of The Northern Koi Club the guest speaker was Garry Joyce of Crystal Clear Ponds and he convinced us that we should be looking at a heat pump. The initial outlay would be expensive but, the running costs are considerably cheaper. Finally, in March 2013 Mike laid a concrete base for the heat pump which we ordered from Crystal Clear Ponds on 17th March.
19th March: With much excitement we went to collect the heat pump. Although it took two men to lift it, they managed to get it onto the back seat of the car. The problem then, was getting it out of the car at home but then thought 'that's what neighbours are for' and subsequently got Paul from next door to give Mike a hand to lift it from the car into the garage.
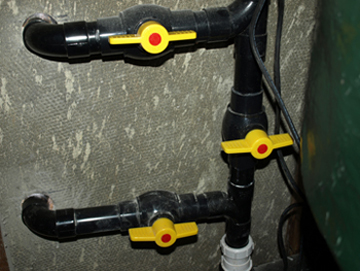
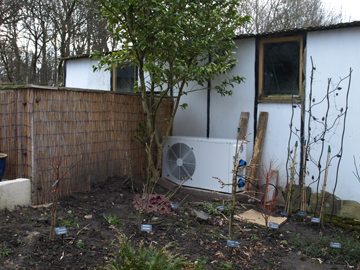 20th March: Mike got up bright and early whilst I was still in the land of nod and moved the heat pump from the garage to the concrete base. Don't ask how he managed to do it on his own because I simply don't know! That's why he got up early because he knew I would not have approved him trying to do it on his own! Mike then drilled holes in the side of the garage to bring the pipes through to the heat pump – the drilling was so noisy that another neighbour came round to see if everything was ok; we think he was actually coming for a nosey! Valves had already been put in so that the water to the heat pump could be bypassed whilst putting in the additional pipework, or for emergencies. The pipework was then duly connected to the pump from the last filter chamber, the valves opened, and, hey presto, the water was running through the pump and back into the pond. 20th March: Mike got up bright and early whilst I was still in the land of nod and moved the heat pump from the garage to the concrete base. Don't ask how he managed to do it on his own because I simply don't know! That's why he got up early because he knew I would not have approved him trying to do it on his own! Mike then drilled holes in the side of the garage to bring the pipes through to the heat pump – the drilling was so noisy that another neighbour came round to see if everything was ok; we think he was actually coming for a nosey! Valves had already been put in so that the water to the heat pump could be bypassed whilst putting in the additional pipework, or for emergencies. The pipework was then duly connected to the pump from the last filter chamber, the valves opened, and, hey presto, the water was running through the pump and back into the pond.
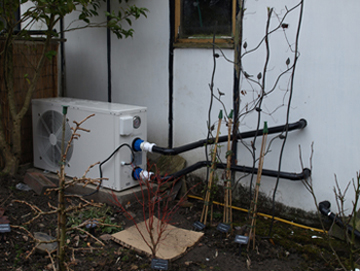 
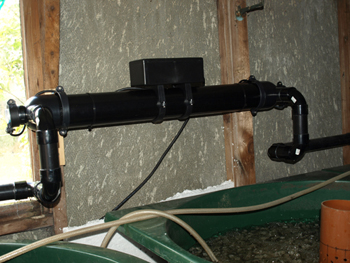
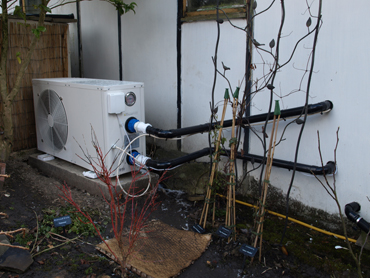
ABOVE LEFT: Although a 5.5kw heat pump would have sufficed for our 3,651 gallon pond, we decided (on recommendation from Garry) to opt for the 8.5kw model. (Click on photo for larger version). The water from the final vortex unit is pumped through the bottom pipe into the heat pump; whilst the top pipe returns it through the UV and then back into the pond.
ABOVE RIGHT: The bottom pipe draws the water from the final vortex unit into the heat pump; the top pipe returns the water from the heat pump, through the UV and back into the pond. The valves on both pipes can be closed to bypass the heat pump if required.
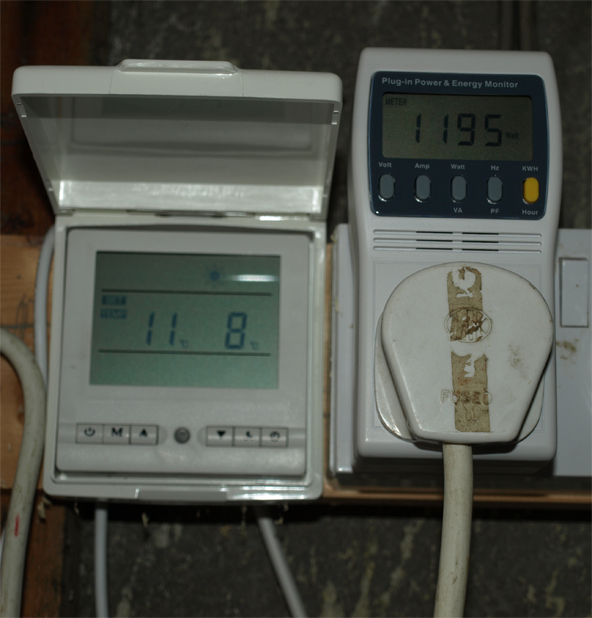
Next step was the electrics – the photos below show the cables going from the heat pump through to the power supply in the garage. The control panel should be installed on the front of the heat pump but, for ease of use, we opted to install it in the garage. Overall, the installation of the heat pump, together with help from the instruction booklet, was relatively easy to install.
The big switch on was at approximately 3.00pm on Tuesday, 26th March, 2013. We had also purchased a power monitor to check the useage and this was plugged in at the same time as the switch on. The temperature of the pond when the big switch on took place was 4oC. Overnight the temperature had reached 6oC and by 2.30pm it was 8oC. As can be seen by the control panel on the left of the photo below, the temperature, at the time of the photo, was 8oC and we have now set the maximum to 11oC. We shall be taking a reading of the power monitor on a daily basis and will record the results at the bottom of this page.
Our electricity is currently 12.5p per unit (excluding VAT) and this is the figure we have used for the running costs of our heat pump.
PLEASE NOTE: AT THE MOMENT THE POND IS NOT COVERED – we appreciate this is wasting heat but we do intend to sort out a suitable cover as soon as funds will allow. If the pond were covered now then the costings below would, obviously, be considerably cheaper. The readings are taken at approximately 2.30pm each day.
Week 1: £23.87 – 26 March to 2 April, 2013
| Date |
Outside Temperature |
Pond Temperature |
Power Monitor Reading |
Number of Units |
Cost Per Day |
Total Running Costs |
| 26.3.13 |
-5oC |
4oC |
0 |
0 |
0 |
0 |
| 27.3.13 |
-4oC |
8oC |
22.42 |
22.42 |
£2.80 |
£2.80 |
| 28.3.13 |
-6oC |
10oC |
50.47 |
28.05 |
£3.51 |
£6.31 |
| 29.3.13 |
-6oC |
12oC |
79.10 |
28.63 |
£3.58 |
£9.89 |
| 30.3.13 |
-5oC |
13oC |
108.00 |
28.90 |
£3.61 |
£13.50 |
| 31.3.13 |
-5oC |
13oC |
136.00 |
28.00 |
£3.50 |
£17.00 |
| 1.4.13 |
-5oC |
14oC |
166.00 |
30.00 |
£3.75 |
£20.75 |
| 2.4.13 |
-5oC |
14oC |
192.00 |
26.00 |
£3.12 |
£23.87 |
Week 2: £17.83 – 2 April to 9 April, 2013
As it has now become virtually impossible to take the readings at 2.30pm each day, we will just record the weekly costings. Unfortunately, on 3rd April, the power monitor was accidentally switched off when cleaning out the filters and so we lost the readings from 2.30pm on 2nd April to 9.00am and have, therefore, had to estimate the useage for that period.
The pond temperature is now maintained at 14oC and the lowest outside temperature during week commencing 2nd April was -5oC. 142.62 units used @ 12.5p per unit.
Week 3: £5.38 – 9 April to 16 April, 2013
The lowest outside temperature was -4oC; 43 units were used @ 12.5p per unit
NOTE: Even when the temperature had gone from 4oC to 6oC the koi began to come to life and were swimming around and coming to the surface, looking for food. Having not fed them since the end of October 2012, I'm pleased to say that we started feeding the koi some Kusuri wheatgerm on 27th March, 2013 when the temperature had reached 9oC and have been feeding small amounts each day since.
The readings after 16th April completely went to pot, however, I started recording them again on 15th December, 2013 as below:
| Heat Pump |
|
|
|
|
| Readings taken at 6.30pm each day |
|
|
|
|
|
|
|
|
| Date |
Meter Reading |
Units Used |
Pond Temp |
Outside Temp |
Cost inc VAT |
| 15.12.13 |
23.32 |
23.32 |
17oC |
7oC |
3.28 |
| 16.12.13 |
46.19 |
22.87 |
18oC |
6oC |
3.22 |
| 17.12.13 |
77.85 |
31.66 |
17oC |
4oC |
4.45 |
| 18.12.13 |
110 |
32.15 |
17oC |
10oC |
4.52 |
| 19.12.13 |
142 |
32 |
17oC |
3oC |
4.50 |
| 20.12.13 |
176 |
34 |
16oC |
9oC |
4.78 |
| 21.12.13 |
207 |
31 |
17oC |
9oC |
4.36 |
| 22.12.13 |
239 |
32 |
17oC |
3oC |
4.50 |
| 23.12.13 |
271 |
32 |
17oC |
10oC |
4.50 |
| 24.12.13 |
297 |
26 |
15oC |
4oC |
3.66 |
| 25.12.13 |
332 |
35 |
15oC |
3oC |
4.92 |
| 26.12.13 |
358 |
26 |
15oC |
4oC |
3.66 |
| 27.12.13 |
389 |
31 |
15oC |
7oC |
4.36 |
| 28.12.13 |
419 |
30 |
15oC |
3oC |
4.22 |
| 29.12.13 |
448 |
29 |
15oC |
5oC |
4.08 |
| 30.12.13 |
480 |
32 |
15oC |
5oC |
4.50 |
| 31.12.13 |
509 |
29 |
15oC |
5oC |
4.08 |
|
|
|
|
|
71.62 |
| JAN 2014 |
|
|
|
|
|
|
|
|
|
|
|
| 1.1.14 |
8.14 |
|
15oC |
11oC |
|
| 2.1.14 |
34.78 |
26.64 |
15oC |
7oC |
3.75 |
| 3.1.14 |
63.49 |
28.71 |
15oC |
6oC |
4.04 |
| 4.1.14 |
95.1 |
31.61 |
15oC |
4oC |
4.45 |
| 5.1.14 |
125 |
29.9 |
15oC |
7oC |
4.21 |
| 6.1.14 |
154 |
29 |
15oC |
9oC |
4.08 |
| 7.1.14 |
173 |
19 |
15oC |
8oC |
2.67 |
| 8.1.14 |
187 |
14 |
14oC |
7oC |
1.97 |
| 9.1.14 |
204 |
17 |
|
|
2.39 |
| 10.1.14 |
229 |
25 |
15oC |
7oC |
3.52 |
| 11.1.14 |
252 |
23 |
14oC |
2oC |
3.24 |
| 12.1.14 |
282 |
30 |
14oC |
6oC |
4.22 |
| 13.1.14 |
295 |
13 |
13oC |
7oC |
1.83 |
| 14.1.14 |
313 |
18 |
13oC |
4oC |
2.53 |
| 15.1.14 |
329 |
16 |
14oC |
10oC |
2.25 |
| 16.1.14 |
343 |
14 |
13oC |
8oC |
1.97 |
| 17.1.14 |
357 |
14 |
13oC |
8oC |
1.97 |
| 18.1.14 |
372 |
15 |
13oC |
9oC |
2.11 |
| 19.1.14 |
386 |
14 |
13oC |
4oC |
1.97 |
| 20.1.14 |
402 |
16 |
13oC |
4oC |
2.25 |
| 21.1.14 |
413 |
11 |
12oC |
6oC |
1.55 |
| 22.1.14 |
423 |
10 |
12oC |
7oC |
1.41 |
| 23.1.14 |
440 |
17 |
12oC |
3oC |
2.39 |
| 24.1.14 |
460 |
20 |
13oC |
6oC |
2.81 |
| 25.1.14 |
473 |
13 |
12oC |
|
1.83 |
| 26.1.14 |
492 |
19 |
13oC |
4oC |
2.67 |
| 27.1.14 |
511 |
19 |
12oC |
6oC |
2.67 |
| 28.1.14 |
526 |
15 |
13oC |
7oC |
2.11 |
| 29.1.14 |
540 |
14 |
12oC |
|
1.97 |
| 30.1.14 |
560 |
20 |
12oC |
2oC |
2.81 |
| 31.1.14 |
578 |
18 |
12oC |
6oC |
2.53 |
|
|
|
|
|
80.18 |
| FEB 2014 |
|
|
|
|
|
|
|
|
|
|
|
| 1.2.14 |
600 |
22 |
13oC |
5oC |
3.10 |
| 2.2.14 |
615 |
15 |
12oC |
6oC |
2.11 |
| 3.2.14 |
631 |
16 |
12oC |
6oC |
2.25 |
| 4.2.14 |
649 |
18 |
12oC |
6oC |
2.53 |
| 5.2.14 |
664 |
15 |
12oC |
7oC |
2.11 |
| 6.2.14 |
678 |
14 |
12oC |
5oC |
1.97 |
| 7.2.14 |
693 |
15 |
12oC |
5oC |
2.11 |
| 8.2.14 |
712 |
19 |
12oC |
5oC |
2.67 |
| 9.2.14 |
728 |
16 |
12oC |
5oC |
2.25 |
| 10.2.14 |
752 |
24 |
12oC |
5oC |
3.38 |
| 11.2.14 |
772 |
20 |
12oC |
5oC |
2.81 |
| 12.2.14 |
801 |
29 |
12oC |
5oC |
4.08 |
| 13.2.14 |
828 |
27 |
12oC |
5oC |
3.80 |
| 14.2.14 |
847 |
19 |
12oC |
9oC |
2.67 |
| 15.2.14 |
865 |
18 |
12oC |
6oC |
2.53 |
| 16.2.14 |
885 |
20 |
12oC |
6oC |
2.81 |
| 17.2.14 |
903 |
18 |
12oC |
7oC |
2.53 |
| 18.2.14 |
912 |
9 |
12oC |
9oC |
1.27 |
| 20.2.14 |
917 |
5 |
12oC |
6oC |
0.70 |
| 23.2.14 |
956 |
39 |
12oC |
12oC |
5.49 |
| 25.2.14 |
974 |
18 |
12oC |
7oC |
2.53 |
| 26.2.14 |
988 |
14 |
12oC |
7oC |
1.97 |
| 27.2.14 |
1001 |
13 |
12oC |
5oC |
1.83 |
| 28.2.14 |
1021 |
20 |
12oC |
6oC |
2.81 |
|
|
|
|
|
62.33 |
| MAR 2014 |
|
|
|
|
|
| 1.3.14 |
1032 |
11 |
12oC |
6oC |
1.55 |
| 2.3.14 |
1044 |
12 |
12oC |
8oC |
1.69 |
| 3.3.14 |
1056 |
12 |
12oC |
6oC |
1.69 |
| 4.3.14 |
1071 |
15 |
12oC |
7oC |
2.11 |
| 5.3.14 |
1083 |
12 |
13oC |
9oC |
1.69 |
| 6.3.14 |
1089 |
6 |
12oC |
12oC |
0.84 |
| 7.3.14 |
1094 |
5 |
12oC |
12oC |
0.70 |
| 8.3.14 |
1107 |
13 |
12oC |
12oC |
1.83 |
| 9.3.14 |
1114 |
7 |
12oC |
14oC |
0.98 |
| 10.3.14 |
1119 |
5 |
13oC |
8oC |
0.70 |
| 11.3.14 |
1133 |
14 |
13oC |
10oC |
1.97 |
| 12.3.14 |
1143 |
10 |
13oC |
12oC |
1.41 |
| 13.3.14 |
1150 |
7 |
12oC |
6oC |
0.98 |
| 14.3.14 |
1161 |
11 |
13oC |
8oC |
1.55 |
| 15.3.14 |
1168 |
7 |
12oC |
11oC |
0.98 |
| 16.3.14 |
1174 |
6 |
12oC |
11oC |
0.84 |
| 17.3.14 |
1189 |
15 |
13oC |
9oC |
2.11 |
| 18.3.14 |
1198 |
9 |
12oC |
12oC |
1.27 |
| 19.3.14 |
1206 |
8 |
13oC |
11oC |
1.13 |
| 21.3.14 |
1230 |
24 |
13oC |
6oC |
3.38 |
| 22.3.14 |
1248 |
18 |
12oC |
5oC |
2.53 |
| 23.3.14 |
1261 |
13 |
12oC |
7oC |
1.83 |
| 25.3.14 |
1289 |
28 |
12oC |
7oC |
3.94 |
| 26.3.14 |
1302 |
13 |
12oC |
7oC |
1.83 |
| 27.3.14 |
1313 |
11 |
13oC |
6oC |
1.55 |
| 29.3.14 |
1324 |
11 |
13oC |
15oC |
1.55 |
| 30.3.14 |
1325 |
1 |
13oC |
15oC |
0.14 |
| 31.3.14 |
1326 |
1 |
13oC |
14oC |
0.14 |
|
|
|
|
|
|
|
|
|
|
|
42.91 |
|
|
|
|
|
|
| APR 2014 |
|
|
|
|
|
| 1.4.14 |
1327 |
1 |
13oC |
16oC |
0.14 |
| 2.4.14 |
1327 |
0 |
13oC |
12oC |
0.00 |
| 3.4.14 |
1330 |
3 |
13oC |
12oC |
0.42 |
| 4.4.14 |
1332 |
2 |
13oC |
13oC |
0.28 |
| |
|
|
|
|
|
| |
|
|
|
|
0.84 |
|
For a complete progress of the building of the pond please have a look at The Pond Album.
Back to top |